


Make a DIY Pet Bed | Inspired Ideas
Pets love to nest, and making a practical, comfortable bed for your dog or cat is fun and easy: Just add wooden knob feet to an old drawer and line it with a plush handcrafted pillow and fiber-filled bumper. Materials to Make a DIY Pet Bed 1 cast-off drawer with knobs sandpaper primer wood glue […]
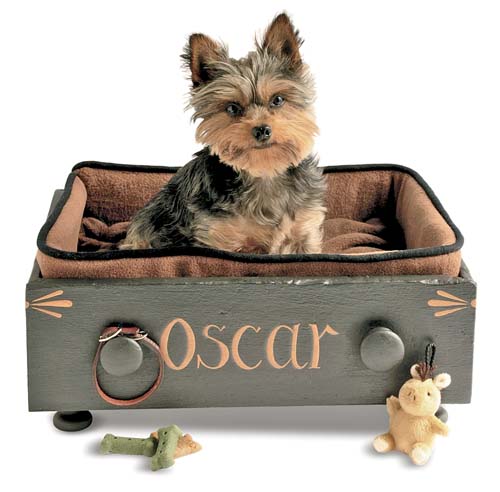
Oscar, designer Matthew Mead’s Yorkshire terrier, is ready for winter, with a comfy place to curl up in his free time. The fleece material is made by Polartec of Lawrence, Massachusetts, and it’s both durable and washable. Drawer knobs keep his collar and favorite toy handy.
Photo Credit : Mead, MatthewPhoto Credit : Mead, Matthew
Pets love to nest, and making a practical, comfortable bed for your dog or cat is fun and easy: Just add wooden knob feet to an old drawer and line it with a plush handcrafted pillow and fiber-filled bumper.
Materials to Make a DIY Pet Bed
- 1 cast-off drawer with knobs
- sandpaper
- primer
- wood glue
- 4 additional knobs (feet)
- black latex paint (satin finish)
- ruler
- pencil
- letter stencil
- brown and gold acrylic paints
- pattern paper
- 1/2 yard dark-brown Polarfleece
- 1/2 yard light-brown Polarfleece
- 1/4 yard black wool fabric
- 3/4 pound buckwheat hulls
- quilting fiberfill
Instructions to Make a DIY Pet Bed
Step 1: Create the Box
Sand and prime the drawer. Affix 4 extra knobs to the bottom of the drawer with wood glue and let dry 24 hours. Paint the box black, let dry, and repeat. To personalize, stencil your dog’s name in acrylic paints. (Use a ruler and make a light pencil line so that it comes out straight.) Let dry.
Step 2: Make the Pillow
Measure the box’s interior length and width. Make a paper pattern and cut out two dark-brown fleece pieces to match. Place fleece pieces on a flat, clean table or counter, with exterior surfaces facing each other. Cut four pieces of black wool fabric, 3/4 inch wide, their lengths equal to the pillow’s four sides. Fold each piece lengthwise to make an edge, and place between fabric pieces on four sides. Pin the layers. Stitch around the pillow, removing pins as you work. Leave a 2-inch hole and turn the piece right side out. Fill with buckwheat hulls and stitch the pillow closed by hand.
Step 3: Make the Bumper
Measure the box’s depth (height), which will become the bumper fabric’s width. Its length will be the sum of the interior dimensions of the box (length and width from Step 2). Make a paper pattern and cut out two light-brown fleece pieces to match. Place fleece pieces on a flat, clean table or counter, with exterior surfaces facing each other. Cut two pieces of black wool fabric, 3/4 inch wide, their lengths equal to the bumper’s long sides. Fold each piece lengthwise to make an edge, and place between fleece pieces on their long sides. Pin and stitch as in Step 2. Stuff lightly with fiberfill and stitch it closed. Now line the box with pillow and bumper as shown in the photo, above, and place a treat inside to entice your furry pal to explore his or her new bed. Home sweet home!
For more home projects, go to: matthewmeadstyle.com
